一、MHA高可用介绍

1.简介

​ MHA(Master HA)是一款开源的MySQL的高可用程序,它为MySQL主从复制架构提供了automating master failover 功能。MHA在监控到master节点故障时,会提升其中拥有最新数据的slave节点成为新的master节点,在此期间,MHA会通过与其它从节点获取额外信息来避免一致性方面的问题。MHA还提供了master节点的在线切换功能,即按需切换master/slave节点。

​ MHA 是由日本人 yoshinorim(原就职于DeNA现就职于FaceBook)开发的比较成熟的 MySQL 高可用方案。MHA 能够在30秒内实现故障切换,并能在故障切换中,最大可能的保证数据一致性。目前淘宝也正在开发相似产品 TMHA, 目前已支持一主一从。

2.MHA工作原理

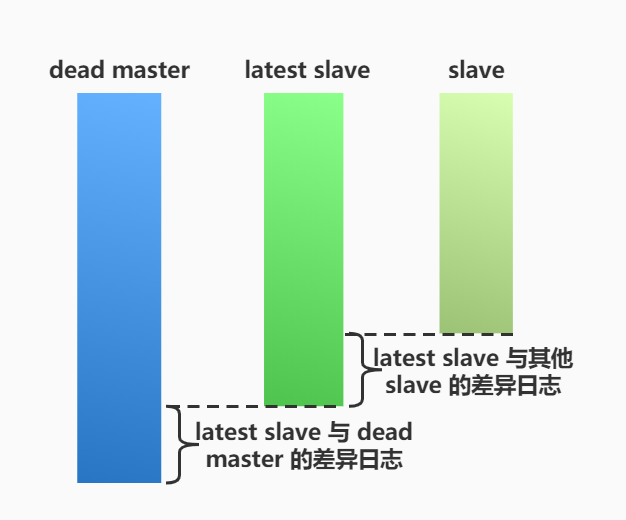
​ 当Master出现故障时,通过对比slave之间I/O线程读取master binlog的位置,选取最接近的slave做为 latest slave。 其它slave通过与latest slave对比生成差异中继日志。在latest slave上应用从master保存的binlog,同时将latest slave提升为master。最后在其它slave上应用相应的差异中继日志并开始从新的master开始复制。
在MHA实现Master故障切换过程中,MHA Node会试图访问故障的master(通过SSH),如果可以访问(不是硬件故障,比如InnoDB数据文件损坏等),会保存二进制文件,以最大程度保 证数据不丢失。MHA和半同步复制一起使用会大大降低数据丢失的危险。

mysql_mha_principle.jpg

MHA工作原理总结为以下几条:
(1) 从宕机崩溃的 master 保存二进制日志事件(binlog events);
(2) 识别含有最新更新的 slave ;
(3) 应用差异的中继日志(relay log) 到其他 slave ;
(4) 应用从 master 保存的二进制日志事件(binlog events);
(5) 提升一个 slave 为新 master ;
(6) 使用其他的 slave 连接新的 master 进行复制。


二、MHA高可用架构

1.特点

  • MHA是C/S架构
  • 整个MHA集群中所有服务器都要安装node节点
  • manager可以装在集群或者集群外任意一台机器上
  • manager尽量不要与master装在一台服务器上
  • 一个MHA的manager可以管理多套集群,只要配置多个配置文件启动即可
  • MHA可以在主从运行中添加
  • MHA通过ssh管理node节点,一点要在集群中做免密登录
  • manager监控主库的node节点,查看是否存活,指挥从库的node节点会在切换主库是发送一些指令

2.MHA优点总结

  1. Masterfailover and slave promotion can be done very quickly.

    自动故障转移快。

  2. Mastercrash does not result in data inconsistency.

    主库崩溃不存在数据一致性问题。

  3. Noneed to modify current MySQL settings (MHA works with regular MySQL).

    不需要对当前mysql环境做重大修改。

  4. Noneed to increase lots of servers.

    不需要添加额外的服务器(仅一台manager就可管理上百个replication)。

  5. Noperformance penalty.

    性能优秀,可工作在半同步复制和异步复制,当监控mysql状态时,仅需要每隔N秒向master发送ping包(默认3秒),所以对性能无影响。你可以理解为MHA的性能和简单的主从复制框架性能一样。

  6. Works with any storage engine.

    只要replication支持的存储引擎,MHA 都支持,不会局限于InnoDB。


三、MHA工具介绍

MHA高可用架构是由manager、node这2款工具实现的。

1.manager相关工具

[root@db01 ~]# tar xf mha4mysql-manager-0.56.tar.gz
[root@db01 ~]# ll mha4mysql-manager-0.56/bin/
#检查主从复制
masterha_check_repl
#检查ssh,检查能否免密登录
masterha_check_ssh
#检查MHA状态
masterha_check_status
#配置主机信息(MHA切换过程中,删除到配置文件中故障的主库)
masterha_conf_host
[server2]
hostname=172.16.1.52
port=3306
[server3]
hostname=172.16.1.53
port=3306
#manager启动程序
masterha_manager
#监控主库是否存活
masterha_master_monitor
#切换主库
masterha_master_switch
#建立连接
masterha_secondary_check
#停止的工具
masterha_stop

-----------------我们使用的工具--------------------
masterha_check_repl
masterha_check_ssh
masterha_manager
masterha_stop

2.node相关工具

[root@db01 ~]# tar xf mha4mysql-node-0.56.tar.gz
[root@db01 ~]# ll mha4mysql-node-0.56/bin/
#对比中继日志
apply_diff_relay_logs
#防止binlog回滚
filter_mysqlbinlog
#删除relay-log #关闭自动删除relay-log的功能
purge_relay_logs
#保存binlog日志
save_binary_logs


四、MHA高可用架构搭建

在搭建MHA高可用前,需要搭建好MySQL的主从复制,可以是普通的异步复制、半同步复制、基于GTID的主从复制。本文以基于GTID主从复制为例,搭建MHA高可用架构。

1.准备环境

主机名 IP地址 角色
db01 172.16.1.51 master
db02 172.16.1.52 slave1、candidate_master
db03 172.16.1.53 slave2、manager

2.修改数据库配置文件

这些配置包含了GTID模式主从复制、MHA的必要配置。

#主库db01配置文件
[root@db01 ~]# vim /etc/my.cnf
[mysqld]
skip_name_resolve=ON
server_id=1
log_bin=mysql-bin
relay_log=relay-log
gtid_mode=ON
enforce_gtid_consistency=ON
log_slave_updates=ON
relay_log_purge=0

#从库db02配置文件
[root@db02 ~]# vim /etc/my.cnf
[mysqld]
skip_name_resolve=ON
server_id=2
log_bin=mysql-bin
relay_log=relay-log
gtid_mode=ON
enforce_gtid_consistency=ON
log_slave_updates=ON
relay_log_purge=0

#从库db03配置文件
[root@db03 ~]# vim /etc/my.cnf
skip_name_resolve=ON
server_id=3
log_bin=mysql-bin
relay_log=relay-log
gtid_mode=ON
enforce_gtid_consistency=ON
log_slave_updates=ON
relay_log_purge=0

log_slave_updates=ON和relay_log_purge=0

  • log_slave_updates=ON,让从库也记录binlog日志

  • relay_log_purge=0,关闭中继日志自动删除

3.配置基于GTID的主从复制

配置GTID的主从复制,需要开启GTID模式,主要要加入gtid_mode=ONenforce_gtid_consistency=ON log_slave_updates=ON这三行配置。

关于GTID的详细介绍可以参考这篇文章https://www.wanhebin.com/database/mysql/734.html

3.1 主库操作

mysql> grant replication slave on *.* to rep@'172.16.1.%' identified by '123';

3.2 从库操作

  • 执行change master to 语句
mysql> change master to 
master_host='172.16.1.51',
master_port=3306,
master_user='rep',
master_password='123',
master_auto_position=1;
  • 启动从库线程
mysql> start slave;

4.部署MHA

在部署MHA之前,需要先满足以下条件:

  • 从库是否开启了binlog
  • 从库是否配置了binlog保存(log-slave-updates)
  • 复制架构中server_id要唯一
  • 主库与从库数据的一致性
  • 所有节点都要创建主从用户
  • 配置relay-log不自动删除(relay_log_purge=0)

4.1 安装依赖环境

  • node节点安装依赖
yum install perl-DBD-MySQL -y
  • manager节点安装依赖
yum install -y perl-Config-Tiny epel-release perl-Log-Dispatch perl-Parallel-ForkManager perl-Time-HiRes

4.2 下载安装MHA的node和manager软件工具

MHA 的软件包可以去 Github 下载。

  • 在整个复制架构中的所有服务器安装mha4mysql-node工具
yum localinstall -y mha4mysql-node-0.56-0.el6.noarch.rpm  
  • 在manager节点安装mha4mysql-manager工具
yum localinstall -y mha4mysql-manager-0.56-0.el6.noarch.rpm 

4.3 在主库上创建一个MHA的管理用户

mysql> grant all on *.* to mhaadmin@'172.16.1.%' identified by 'mhapass';

4.4 配置三台机器的ssh免密互信(三台都要操作)

方法一:执行命令实现ssh互信

ssh-keygen -t rsa
ssh-copy-id -i /root/.ssh/id_rsa.pub root@172.16.1.51
ssh-copy-id -i /root/.ssh/id_rsa.pub root@172.16.1.52
ssh-copy-id -i /root/.ssh/id_rsa.pub root@172.16.1.53

方法二:使用免密脚本ssh-key.sh实现ssh互信

#!/bin/bash
#下载安装sshpass命令
yum install -y sshpass &> /dev/null
#生成ssh-key秘钥
ssh-keygen -t rsa -f /root/.ssh/id_rsa -P "" -q &&\
#免密推送秘钥给其他几台服务器(db01,db02,db03)
for i in {51..53}
do
sshpass -p1 ssh-copy-id -i /root/.ssh/id_rsa.pub -o StrictHostKeyChecking=no root@172.16.1.${i} &> /dev/null
done

4.5 配置MHA配置文件

  • 创建mha相关目录
mkdir -p /service/mha/{app1,etc,scripts}
  • 配置文件
[root@db03 ~]# vim /service/mha/etc/app1.cnf
[server default]
#设置manager的日志
manager_log=/service/mha/app1/manager.log
#设置manager的工作目录
manager_workdir=/service/mha/app1
#设置master 保存binlog的位置
master_binlog_dir=/usr/local/mysql/data
#设置自动failover时候的切换脚本
master_ip_failover_script=/service/mha/scripts/master_ip_failover
#设置手动切换时候的切换脚本
master_ip_online_change_script=/service/mha/scripts/master_ip_online_change

#设置mha管理用户名
user=mhaadmin
#设置mha管理用户密码
password=mhapass
#设置复制环境中的复制用户名
repl_user=rep
repl_password=123
#设置免密登录用户
ssh_user=root
#发送ping包的时间间隔
ping_interval=2

[server1]
hostname=172.16.1.51
port=3306

[server2]
hostname=172.16.1.52
port=3306
#设置为候选master,如果设置该参数以后,发生主从切换以后将会将此从库提升为主库
candidate_master=1
#默认情况下如果一个slave落后master 100M的relay logs的话,MHA将不会选择该slave作为一个新的master,因为对于这个slave的恢复需要花费很长时间,通过设置check_repl_delay=0,MHA触发切换在选择一个新的master的时候将会忽略复制延时,这个参数对于设置了candidate_master=1的主机非常有用,因为这个候选主在切换的过程中一定是新的master
check_repl_delay=0

[server3]
hostname=172.16.1.53
port=3306

4.6 配置VIP漂移脚本(manager节点)

  • 自动failover脚本 /service/mha/scripts/master_ip_failover
#!/usr/bin/env perl

use strict;
use warnings FATAL => 'all';

use Getopt::Long;

my (
$command, $ssh_user, $orig_master_host, $orig_master_ip,
$orig_master_port, $new_master_host, $new_master_ip, $new_master_port
);

my $vip = '172.16.1.59/24';
my $key = '1';
my $ssh_start_vip = "/sbin/ifconfig eth1:$key $vip";
my $ssh_stop_vip = "/sbin/ifconfig eth1:$key down";

GetOptions(
'command=s' => \$command,
'ssh_user=s' => \$ssh_user,
'orig_master_host=s' => \$orig_master_host,
'orig_master_ip=s' => \$orig_master_ip,
'orig_master_port=i' => \$orig_master_port,
'new_master_host=s' => \$new_master_host,
'new_master_ip=s' => \$new_master_ip,
'new_master_port=i' => \$new_master_port,
);

exit &main();

sub main {

print "\n\nIN SCRIPT TEST====$ssh_stop_vip==$ssh_start_vip===\n\n";

if ( $command eq "stop" || $command eq "stopssh" ) {

my $exit_code = 1;
eval {
print "Disabling the VIP on old master: $orig_master_host \n";
&stop_vip();
$exit_code = 0;
};
if ($@) {
warn "Got Error: $@\n";
exit $exit_code;
}
exit $exit_code;
}
elsif ( $command eq "start" ) {

my $exit_code = 10;
eval {
print "Enabling the VIP - $vip on the new master - $new_master_host \n";
&start_vip();
$exit_code = 0;
};
if ($@) {
warn $@;
exit $exit_code;
}
exit $exit_code;
}
elsif ( $command eq "status" ) {
print "Checking the Status of the script.. OK \n";
exit 0;
}
else {
&usage();
exit 1;
}
}

sub start_vip() {
`ssh $ssh_user\@$new_master_host \" $ssh_start_vip \"`;
}
sub stop_vip() {
return 0 unless ($ssh_user);
`ssh $ssh_user\@$orig_master_host \" $ssh_stop_vip \"`;
}

sub usage {
print
"Usage: master_ip_failover --command=start|stop|stopssh|status --orig_master_host=host --orig_master_ip=ip --orig_master_port=port --new_master_host=host --new_master_ip=ip --new_master_port=port\n";
}
  • 手动 failover脚本/service/mha/scripts/master_ip_online_change
#!/bin/bash
source /root/.bash_profile
vip=`echo '172.16.1.59/24'` #设置VIP
key=`echo '1'`

command=`echo "$1" | awk -F = '{print $2}'`
orig_master_host=`echo "$2" | awk -F = '{print $2}'`
new_master_host=`echo "$7" | awk -F = '{print $2}'`
orig_master_ssh_user=`echo "${12}" | awk -F = '{print $2}'`
new_master_ssh_user=`echo "${13}" | awk -F = '{print $2}'`

#要求服务的网卡识别名一样,都为eth1(这里是)
stop_vip=`echo "ssh root@$orig_master_host /usr/sbin/ifconfig eth1:$key down"`
start_vip=`echo "ssh root@$new_master_host /usr/sbin/ifconfig eth1:$key $vip"`

if [ $command = 'stop' ]
then
echo -e "\n\n\n****************************\n"
echo -e "Disabled thi VIP - $vip on old master: $orig_master_host \n"
$stop_vip
if [ $? -eq 0 ]
then
echo "Disabled the VIP successfully"
else
echo "Disabled the VIP failed"
fi
echo -e "***************************\n\n\n"
fi

if [ $command = 'start' -o $command = 'status' ]
then
echo -e "\n\n\n*************************\n"
echo -e "Enabling the VIP - $vip on new master: $new_master_host \n"
$start_vip
if [ $? -eq 0 ]
then
echo "Enabled the VIP successfully"
else
echo "Enabled the VIP failed"
fi
echo -e "***************************\n\n\n"
fi
  • 给脚本添加执行权限
chmod +x /service/mha/scripts/master_ip_failover 
chmod +x /service/mha/scripts/master_ip_online_change

4.7 启动前验证MHA

  • 通过 masterha_check_ssh 验证 ssh 信任登录是否成功
[root@db03 ~]# masterha_check_ssh --conf=/service/mha/etc/app1.cnf
Wed Apr 16 23:17:58 2020 - All SSH connection tests passed successfully. #表示所有都成功
  • 通过 masterha_check_repl 验证 mysql 主从复制是否成功
[root@db03 ~]# masterha_check_repl --conf=/service/mha/etc/app1.cnf
MySQL Replication Health is OK. #表示所有都成功

4.8 启动MHA

  • 第一次启动,先在master上手动绑定vip,以后会自动切换
[root@db01 ~]# /usr/sbin/ifconfig eth1:1 172.16.1.59/24
  • 启动命令
[root@db03 ~]# nohup masterha_manager --conf=/service/mha/etc/app1.cnf --remove_dead_master_conf --ignore_last_failover < /dev/null > /service/mha/logs/masterha_manager.log 2>&1 &

#选项说明
--remove_dead_master_conf #移除配置文件中已宕机的主机信息
--ignore_last_failover #忽略上一次切换

注意

MHA监控脚本切换一次就会退出,需要再次启动

  • 关闭命令
masterha_stop --conf=/service/mha/etc/app1.cnf

拓展:MySQL安全机制

1.完成一次切换,会生成一个锁文件

2.下一次切换前,会检查锁文件

3.如果锁文件存在,则8小时以内不允许再次切换

4.9 检查MHA的状态

  • 检查MHA的启动状态
[root@db03 ~]# tailf /service/mha/app1/manager.log
...
#如果最后一行是如下,表明启动成功
Ping(SELECT) succeeded, waiting until MySQL doesn’t respond..
  • 检查集群状态
[root@db03 ~]# masterha_check_status --conf=/service/mha/etc/app1.cnf
mha (pid:7598) is running(0:PING_OK), master:172.16.1.51

#注:上面的信息中“mha (pid:7598) is running(0:PING_OK)”表示MHA服务运行OK,否则, 则会显示为类似“mha is stopped(1:NOT_RUNNING).”

4.10 切换测试

测试当master节点宕机后,一个slave被提升为新的master节点,且VIP也漂移到了这台新的master节点。

  • 手动关闭master节点的mysql服务
[root@db01 ~]# systemctl stop mysqld
  • 查看从库状态,确定master节点是否切换成功

在从库db03上查看slave状态,db03从库是指向db02这台服务器的(即db03为db02的slave节点),则证明MHA的切换测试成功。

mysql> show slave status\G
Master_Host: 172.16.1.52
Slave_IO_Running: Yes
Slave_SQL_Running: Yes
  • 检查VIP是否漂移到了新的master节点

在db02上观察到,VIP172.16.1.59 已经漂移到了db02(新的master)上

[root@db02 ~]# ip address show eth1
3: eth1: <BROADCAST,MULTICAST,UP,LOWER_UP> mtu 1500 qdisc pfifo_fast state UP group default qlen 1000
link/ether 00:0c:29:a3:cd:4a brd ff:ff:ff:ff:ff:ff
inet 172.16.1.51/24 brd 172.16.1.255 scope global noprefixroute eth1
valid_lft forever preferred_lft forever
inet 172.16.1.59/24 brd 172.16.1.255 scope global secondary eth1:1
valid_lft forever preferred_lft forever
inet6 fe80::20c:29ff:fea3:cd4a/64 scope link
valid_lft forever preferred_lft forever

5.将故障的master节点重新加入集群

通常情况下自动切换以后,原master可能已经废弃掉,待原master主机修复后,如果数据完整的情况下,可能想把原来master重新作为新主库的slave,这时我们可以借助当时自动切换时刻的MHA志来完成对原master的修复。

  • 修改manager配置文件(只针对自动切换的,在线切换不会删除配置)

在/service/mha/etc/app1.cnf中添加如下内容

[server1]
hostname=172.16.1.51
port=3306
candidate_master=1
check_repl_delay=0
  • 修复旧的master,然后配置成为新master的slave节点

这里需要注意一点,如果是基于GTID的主从复制框架,可自动定位到binlog位置点,可以不查看日志寻找位置点信息。若是其他的主从复制架构,则需要通过日志来查看binglog位置点。

查看manager切换时产生的日志信息,找到CHANGE MASTER TO语句相关信息。

[root@db03 ~]# less /service/mha/app1/manager.log
Wed Jul 1 16:27:51 2020 - [info] All other slaves should start replication from here. Statement should be: CHANGE MASTER TO MASTER_HOST='172.16.1.52', MASTER_PORT=3306, MASTER_AUTO_POSITION=1, MASTER_USER='rep', MASTER_PASSWORD='xxx';

#由于本文使用的是GTID的主从复制架构,所以这里并没显示出binglog位置点,若是使用的其他复制架构,这里则可以显示出binglog位置点信息
  • 在旧master上执行change master to 语句
mysql> change master to 
master_host='172.16.1.52',
master_user='rep',
master_password='123',
master_auto_position=1;
  • 启动旧master的线程,并查看从库状态
mysql> start slave;
mysql> show slave status\G

到这里,旧master就可以同步新master的数据了。此时旧的master已经重新加入集群,变成mha集群中的一个slave角色了。

  • 在manager节点上重新启动manager监控进程
nohup masterha_manager --conf=/service/mha/etc/app1.cnf --remove_dead_master_conf --ignore_last_failover < /dev/null > /service/mha/logs/masterha_manager.log 2>&1 &

master节点故障设置成slave节点脚本mha_master_recover_to_slave.sh

#!/bin/bash
#设置mysql服务变量
mysqlserver=`ps -ef | grep [m]ysql | wc -l`
#判断mysql服务是否存在,启动或重启
if [ $mysqlserver -eq 0 ];then
systemctl start mysqld
else
pkill mysqld
systemctl start mysqld
fi
#mysql启动需要时间
sleep 3
#获取change master to语句,并修改rep的密码为123
change=`ssh 172.16.1.53 "grep -i 'change master to' /service/mha/app1/manager.log | tail -1 | sed -r 's#(.*)(CHANGE.*)#\2#g' | sed 's#xxx#123#g'"`
#恢复的数据执行change语句
mysql -e "$change;start slave"
#修改manager的配置文件
if [ -z ]
ssh 172.16.1.53 "cat>>/service/mha/etc/app1.cnf<<EOF

[server1]
hostname=172.16.1.51
port=3306
EOF"
#远程启动mha
ssh 172.16.1.53 "nohup masterha_manager --conf=/service/mha/etc/app1.cnf --remove_dead_master_conf --ignore_last_failover < /dev/null > /service/mha/masterha_manager.log 2>&1 &"

6.MHA主库切换机制

  • 读取manager配置文件,查看是否有优先级设置
#优先提升为主库
candidate_master=1
#关闭检查恢复延迟
check_repl_delay=0
  • 数据量不同时,从库中relay log最新的优先级高

  • 如果没有配置优先级,并且数据量相同,主机标签小的优先级高

[server1] > [server2] > [server3]
[a] > [b] > [c]
[1] > [2] > [3]

7.配置MHA让manager获取binglog信息

当MHA高可用架构中master故障时,MHA把从库提升为主库,从库和主库之间可能会存在数据差异,manager通过获取主库的binlog给从库同步数据。

但这里面有个问题,若主库只是MySQL服务停止了,manager可以去主库获取binglog;但如果主库服务器出现故障无法通过网络连接时,manager就无法拿到binglog给从库同步存在差异的数据了。

这里给出一个解决方案:配置MHA,在manager开启一个进程,实时的把主库产生binglog获取到manager端,后续切换master时,就在manager端拿取binlog同步数据。

7.1 配置manager的配置文件(实时获取)

[root@db03 ~]# cat>>/service/mha/etc/app1.cnf<<EOF

[binlog1]
no_master=1
hostname=172.16.1.53
master_binlog_dir=/data/mysql/binlog
EOF

7.2 创建binlog存放目录

[root@db03 ~]# mkdir -p /data/mysql/binlog

7.3 启动binlog实时获取进程

进入到 /data/mysql/binlog 目录下启动进程

[root@db03 ~]# cd /data/mysql/binlog
[root@db03 ~]# mysqlbinlog -R --host=172.16.1.51 --user=mhaadmin --password=mhapass --raw --stop-never mysql-bin.000001 &

命令选项说明:

  • -R :–read-from-remote-server:备份远端服务器的binlog
  • –host:指定远端主机
  • –user:指定用户
  • –password:指定密码
  • –raw:将binlog以二进制方式存储
  • –stop-never:从指定的binlog开始,以后生成的所有binlog都会同步

7.4 重新启动manager监控进程

nohup masterha_manager --conf=/service/mha/etc/app1.cnf --remove_dead_master_conf --ignore_last_failover < /dev/null > /service/mha/masterha_manager.log 2>&1 &